Common Bathroom Sink Drain Problems
Bathroom sink drain issues are among the most common plumbing problems homeowners face. Understanding what causes these problems helps you address them quickly and effectively.
Hair and Soap Scum Clogs
The most frequent culprit behind bathroom sink clogs is the combination of hair strands tangling with soap scum and mineral deposits from hard water. Hair easily catches in the drain's pop-up assembly and P-trap, creating a web that traps other debris like toothpaste residue and hygiene products. Soap reacts with minerals in hard water to form a sticky, chalky buildup that narrows pipes over time. This combination creates dense blockages that restrict water flow and worsen gradually if left untreated.
Leaking P-Traps
The P-trap is the U-shaped pipe under your sink designed to hold water and block sewer gases. Leaks commonly develop at the slip nut connections where the P-trap connects to the tailpiece and wall pipe. These leaks occur when gaskets deteriorate, nuts loosen from vibration, or when corrosion weakens the connections. You'll notice water pooling in the cabinet under your sink or dripping sounds after running water.
Most P-trap leaks start small but worsen as gaskets compress further or corrosion spreads. Tightening connections temporarily stops minor leaks, but replacing worn gaskets or the entire P-trap provides a lasting solution. If you're experiencing persistent issues, water line leak detection can identify hidden problems before they cause water damage.
Stuck or Malfunctioning Stoppers
Pop-up drain stoppers can stick in the open or closed position due to hair wrapped around the pivot rod mechanism, buildup on the stopper itself, or a disconnected linkage. When the lift rod doesn't respond properly, water won't drain or won't hold in the basin. This frustrating problem prevents normal sink use and often indicates accumulated debris in the stopper assembly.
Slow Drainage Issues
Water pooling in your sink and draining slowly indicates a partial blockage. This typically results from gradual buildup of biofilm (a slimy layer of bacteria feeding on organic matter in pipes), combined with hair and soap residue that hasn't completely blocked the drain yet. Slow drainage often precedes complete clogs, giving you warning time to address the issue before water stops draining entirely.
Temperature changes affect slow drainage too, as cold weather thickens grease and soap buildup while hot water temporarily improves flow. If you notice slow drainage throughout your home, the problem may extend beyond your bathroom sink and require a plumbing service cost guide to budget for professional help.
Persistent Drain Odors
Foul smells emanating from your bathroom sink drain have several causes. A dry P-trap allows sewer gases to escape into your bathroom, while biofilm produces hydrogen sulfide with its characteristic rotten egg smell. Mold and mildew can also grow in dark, moist drain pipes, contributing to unpleasant odors. Unused guest bathrooms commonly develop odors because the P-trap water evaporates without regular use.
Odors that accompany gurgling sounds when water drains suggest plumbing vent problems in your system. This creates negative pressure that can pull water from P-traps, allowing sewer gases to enter your home. For deeper odor diagnosis, see our guide on the sewer gas smell in house and how to track it down room by room.

Find Trusted & Licensed Plumbers in Ohio
Get matched with companies for your specific needs
DIY Repair Steps
Most bathroom sink drain problems respond well to DIY repairs when you follow proper procedures and use appropriate tools. These step-by-step methods address the most common issues homeowners encounter.
Cleaning the Pop-Up Assembly
Start with the most accessible component, the pop-up stopper mechanism where hair and debris accumulate most. This straightforward cleaning often resolves slow drainage and stuck stoppers without requiring extensive disassembly.
Tools needed: Rubber gloves, bucket, pliers, barbed hair tool (Zip-It or silicone version), old rags
Steps:
- Remove standing water from the sink with a cup or towel
- Lift the pop-up stopper by pulling upward; twist if it resists
- If the stopper won't lift, locate the pivot rod under the sink
- Unscrew the pivot rod nut (hand-tight or use pliers) and remove the rod
- Pull out the stopper and use a barbed strip or wire hook to extract hair clumps
- Scrub the stopper with baking soda paste or dish soap
- Clean the drain opening with the hair tool
- Reassemble by inserting the stopper and reconnecting the pivot rod
- Test the lift rod mechanism and run water to check flow
Newer flexible silicone hair tools released in 2025 and 2026 are less likely to scratch metal drains and fit through pop-up assemblies better than the older thick plastic strips. Regular pop-up assembly cleaning every 2 to 4 weeks prevents severe buildup and maintains optimal drainage.
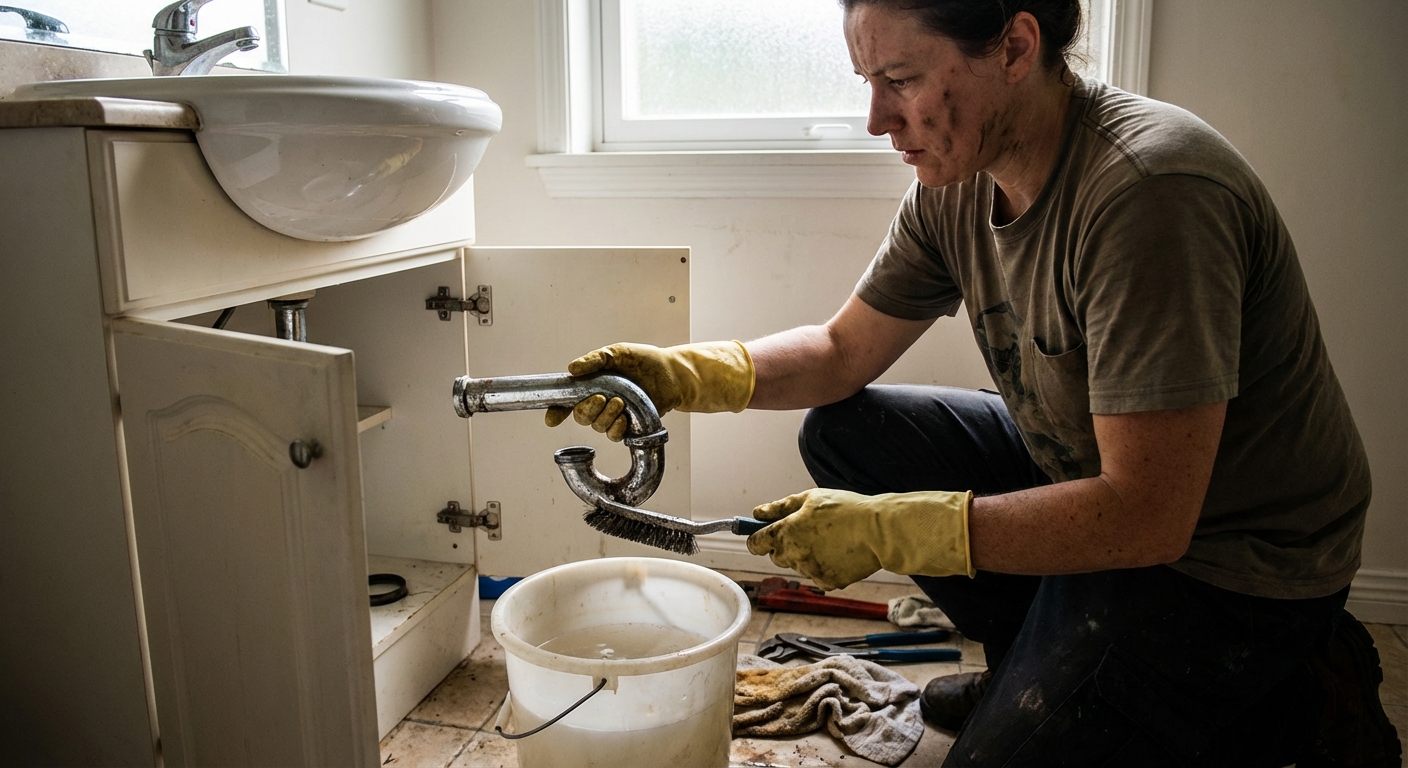
P-Trap Removal and Cleaning
If cleaning the pop-up assembly doesn't resolve the issue, the clog likely sits in the P-trap itself. This curved pipe catches debris that passes the stopper and requires occasional cleaning for optimal performance.
Tools needed: Bucket, rubber gloves, adjustable wrench or pliers, towels, brush
Steps:
- Place a bucket directly under the P-trap to catch water and debris
- Spread towels around the work area
- Locate the slip nuts on both ends of the P-trap (hand-loosen counterclockwise)
- If nuts are tight, use a wrench with a rag wrapped around to protect the finish
- Remove the P-trap and dump contents into the bucket
- Rinse the P-trap thoroughly with hot water
- Use a brush to scrub the inside, removing all buildup
- Inspect gaskets for cracks or deterioration and replace if needed
- Reconnect the P-trap hand-tight, then give it a quarter turn with the wrench
- Run water and check for leaks; tighten connections if necessary
Most hardware stores sell P-trap gaskets for $2 to $5 each in 2026. Replacing worn gaskets during cleaning prevents future leaks and ensures watertight connections. If you encounter severe corrosion or leaks persist after reassembly, consider consulting an emergency plumber cost guide before booking complex repairs.
Stopper Adjustment Techniques
Sometimes the stopper mechanism just needs adjustment rather than cleaning. Proper alignment ensures the stopper seals completely when closed and opens fully for drainage.
For vertical adjustment:
- Locate the clevis strap (flat metal piece) under the sink connected to the lift rod
- Loosen the screw holding the clevis to the pivot rod
- Adjust the position up or down to change how high the stopper opens
- Tighten the screw and test
For horizontal adjustment:
- The pivot rod can usually be repositioned in different holes on the clevis strap
- Move it to a hole closer to or farther from the tailpiece
- This changes the leverage and can help a stuck stopper move more freely
Test adjustments by operating the lift rod several times and running water to verify proper sealing and drainage. Fine-tuning these settings eliminates most stopper problems without replacing components.
Natural Drain Cleaning Methods
Before disassembling anything, try these gentle cleaning approaches that work effectively for minor clogs and regular maintenance:
Boiling water method:
- Boil a pot of water
- Pour slowly down the drain in 2-3 stages
- Allow a few minutes between pours
- Works well for soap and grease buildup
Baking soda and vinegar:
- Pour 1 cup baking soda down the drain
- Follow with 1 cup white vinegar
- Cover the drain opening immediately
- Let the fizzing reaction work for 30 minutes
- Flush with hot water
Enzyme-based maintenance cleaners:
- Products like Bio-Clean and Green Gobbler Enzymatic Cleaner use natural bacteria and enzymes to digest hair, soap scum, and organic waste
- Apply monthly per label instructions, usually before bed
- Activate with lukewarm water (boiling water kills the enzymes) and let it sit 6 to 8 hours
- Safe for all pipe materials and septic systems
These approaches cost pennies to a few dollars per treatment compared to commercial chemical cleaners and avoid harsh chemistries that can damage pipes or harm the environment.
When to Replace the Drain Assembly
Sometimes repairs aren't enough and complete replacement becomes the most cost-effective solution. Recognizing when to replace rather than repair saves time and prevents recurring problems.
Signs Replacement Is Necessary
Repair attempts become futile when the drain assembly shows certain conditions. Visible corrosion or pitting on metal components indicates structural weakness that cleaning can't fix. Persistent leaks that continue after tightening all connections and replacing gaskets suggest warped or damaged parts. Cracked drain flanges or tailpieces cannot create a watertight seal no matter how much plumber's putty you apply.
Additional warning signs include:
- Chrome finish flaking or severely discolored
- Plastic components that have become brittle or cracked
- Threaded connections stripped from overtightening
- Frequent recurring clogs despite regular cleaning
- Age exceeding 15 to 20 years with visible wear
If you're dealing with broader plumbing issues, our guide to common plumbing mistakes homeowners make helps identify whether drain problems are isolated or part of a larger pattern.
Choosing Quality Replacement Parts
When purchasing a new drain assembly in 2026, select materials based on durability and compatibility. Solid brass assemblies offer the longest lifespan and resist corrosion but cost $40 to $100. Basic PVC and chrome-plated plastic assemblies run $10 to $20 at major retailers (a name-brand chrome-plated plastic pop-up assembly is currently around $14 at Home Depot). Standard chrome pop-up drains run roughly $20 to $30, while designer finishes in polished brass, nickel, or matte black can range from $80 to $200 or more.
| Material | Cost Range (2026) | Lifespan | Best For |
|---|---|---|---|
| Solid Brass | $40-$100 | 20-30 years | Long-term investment, corrosive water |
| Chrome-Plated Brass | $30-$60 | 15-20 years | Visible drains, balance of cost and quality |
| Chrome-Plated Plastic / PVC | $10-$20 | 10-15 years | Budget repairs, concealed drains |
| Stainless Steel | $50-$80 | 20-25 years | Modern aesthetics, high durability |
| Designer Finishes | $80-$200+ | 15-25 years | Decorative exposed drains |
Ensure the drain size matches your sink. Most bathroom sinks use 1-1/4" diameter drains, though some older or larger sinks may have 1-1/2" openings. Measure before shopping or take the old assembly to the hardware store for comparison. Mismatched sizes require adapters that complicate installation and create potential leak points.
Installation Basics
Replacing a drain assembly involves removing all old components, cleaning the sink opening thoroughly, applying fresh plumber's putty around the new flange, inserting the drain body through the sink hole, and securing it from underneath with the gasket and nut. Connect the new tailpiece and P-trap, ensuring all connections are hand-tight plus a quarter turn with a wrench.
Work methodically to avoid cross-threading or overtightening, which damages components. Test thoroughly by running water for several minutes while checking all connections for leaks. Address any drips immediately before they cause cabinet damage.
For complex installations involving non-standard configurations, professional installation ensures proper function and prevents costly water damage from improper sealing.
Costs and Budget Considerations
Understanding repair and replacement costs helps you budget appropriately and decide between DIY and professional services. These current 2026 market rates guide your decision-making.
DIY Repair Costs
Tackling bathroom sink drain repairs yourself saves significant money on labor. Basic tools like adjustable pliers, a bucket, and rubber gloves cost $15 to $30 if you don't already own them. Drain cleaning supplies such as baking soda, vinegar, enzyme cleaners, and a hand snake run $5 to $25. A complete drain assembly replacement kit costs $15 to $100 depending on material quality.
Your total DIY investment typically ranges from $20 to $100 for most repairs, with the primary expense being replacement parts if needed. The time investment is usually 1 to 2 hours for a complete repair or replacement.
Breakdown of typical 2026 DIY costs:
- Barbed hair removal tool: $3 to $8
- Plumber's putty: $4 to $8
- Replacement gaskets: $2 to $5 each
- P-trap assembly: $8 to $25
- Complete drain kit: $15 to $100
- Enzyme drain cleaner (monthly maintenance): $15 to $40
- Basic tool set (if needed): $15 to $30
Professional Plumber Costs
Hiring a professional ensures proper repairs but increases costs significantly. In 2026, plumbers generally charge $75 to $150 per hour plus parts, with national plumbing service totals typically running $182 to $499 per project. A standard bathroom sink drain repair or clog clearing usually falls between $150 and $300, with most homeowners paying around $200 to $250.
Clearing a simple clogged drain runs about $100 to $275, while drain assembly replacement runs $200 to $500 for standard installations. Complex issues like corroded shutoff valves, mismatched pipe sizes requiring adapters, or work involving walls and venting systems push costs to $500 or more. Emergency calls outside normal business hours are significantly more expensive, with after-hours bathroom drain visits typically running $300 to $800 total, including a $150 to $250 emergency service call fee plus $100 to $350 per hour in labor.
Professional services include:
- Diagnostic assessment
- Proper tools and replacement parts
- Warranty on workmanship (typically 30-90 days)
- Code-compliant installation
- Cleanup and disposal of old parts
Cost-Benefit Analysis
Consider DIY for straightforward clogs, accessible leaks, and standard replacements when you have basic tools and a few hours. Call a professional when dealing with seized fittings that won't budge, leaks behind walls, recurring problems after attempted fixes, or if you're uncomfortable working under sinks. Our guide on when to call an emergency plumber vs wait can help you decide whether a same-day call is justified.
Factor in your confidence level, available time, and the specific problem when deciding. Simple clogs and stopper cleaning favor DIY, while persistent leaks or replacement needs may justify professional help. For broader drain or sewer issues, our sewer line repair cost guide covers when problems extend beyond a single fixture.
Prevention and Maintenance
Proactive maintenance prevents most bathroom sink drain problems and saves money compared to repair costs. These strategies keep your drains flowing freely year-round.
Regular Cleaning Schedule
Prevent drain problems before they start with weekly maintenance. Pour boiling water down drains once a week to dissolve soap buildup and kill bacteria. Monthly treatments with baking soda and vinegar or an enzyme cleaner like Bio-Clean keep biofilm from establishing. Every few months, remove and clean the pop-up stopper to prevent hair accumulation.
Guest bathrooms and powder rooms need attention despite infrequent use. Run water for 2 to 5 minutes weekly in these sinks to maintain P-trap water seals and prevent sewer gas odors. This simple habit prevents dry traps and keeps all fixtures operational.
Create a maintenance calendar to track cleaning schedules:
- Weekly: Hot water flush, run water in unused sinks
- Monthly: Baking soda and vinegar or enzyme cleaner treatment
- Quarterly: Remove and clean pop-up stopper
- Semi-annually: Inspect P-trap connections for leaks
- Annually: Replace deteriorating gaskets preventively
Drain Screens and Catchers
Installing a mesh drain screen over your bathroom sink drain catches hair before it enters the plumbing system. These inexpensive devices ($3 to $10) trap debris while allowing water to flow freely. Empty the screen weekly and rinse it clean to maintain effectiveness.
Modern pop-up style drain screens fit around standard stoppers without interfering with their operation. Stainless steel screens last longer than plastic versions and resist corrosion from bathroom chemicals. Newer "clean-out" style replacement pop-ups also let you pull an internal hair basket from above without crawling under the sink.
Proper Use Habits
Avoid pouring thick substances down bathroom drains. Wipe out toothpaste globs and shaving cream before they enter the drain. Never dispose of cotton swabs, dental floss, or other solid objects in the sink, as these items cause stubborn clogs. Brush or comb hair before showering to reduce the amount that washes down the drain.
Educate household members about proper sink use. Children often drop small toys or excessive amounts of products down drains. Simple awareness prevents most foreign object clogs that require professional removal.
Limit chemical exposure to your drains by choosing liquid soaps over bar soap, which creates more scum. Rinse sinks thoroughly after using heavy products like thick shaving cream or styling products. These small habit changes significantly reduce buildup rates.
Water Flow Testing
Run water in all bathroom sinks weekly, especially in guest bathrooms or powder rooms used infrequently. This keeps the P-trap filled with water, maintaining the seal that blocks sewer gases. Let water run for 2 to 5 minutes to ensure adequate water volume in the trap and verify normal drainage speed.
While testing water flow, listen for unusual sounds like gurgling or slow drainage that indicate developing problems. Early detection allows you to address minor issues before they become emergencies requiring expensive repairs. Visual inspection during weekly use identifies slow leaks before they cause cabinet damage. If gurgling persists, check our plumbing vent problems guide for next steps.
Frequently Asked Questions
How do I fix a bathroom sink that drains slowly?
Start by removing and cleaning the pop-up stopper mechanism, which catches most hair and debris. Pull the stopper out, clean it thoroughly, and use a barbed hair tool to extract accumulated hair from the drain opening. If slow drainage persists, pour a mixture of 1 cup baking soda and 1 cup vinegar down the drain, let it sit for 30 minutes, then flush with hot water. For stubborn clogs, remove and clean the P-trap under the sink by loosening the slip nuts and clearing debris.
Why does my bathroom sink drain smell bad?
Drain odors typically result from a dry P-trap allowing sewer gases to escape, or from biofilm buildup where bacteria decompose organic matter in the pipes. Run water for several minutes to refill a dry P-trap, which should eliminate sewer gas smells within hours. For biofilm-related odors, an enzyme drain cleaner like Bio-Clean or Green Gobbler Enzymatic Cleaner used monthly will break down the bacterial layer. If odors persist, check for blocked vents or deeper sewer line issues that need professional attention.
Can I use chemical drain cleaners in my bathroom sink?
Chemical drain cleaners can dissolve clogs but pose risks to older pipes and the environment. Harsh chemicals can corrode metal pipes, damage PVC with repeated use, create dangerous fumes, and cause skin burns if mishandled. Natural methods using baking soda, vinegar, hot water, and enzyme cleaners are safer for regular maintenance and won't damage your plumbing, though they work more slowly. Reserve chemical cleaners for severe clogs that don't respond to natural methods or mechanical removal.
How often should I clean my bathroom sink drain?
Preventive cleaning every 2 to 4 weeks keeps drains flowing smoothly and prevents major clogs from developing. Remove and clean the pop-up stopper monthly to prevent hair buildup in the mechanism and drain opening. Weekly hot water flushes help dissolve soap residue, and a monthly enzyme treatment keeps biofilm in check. Sinks used by multiple people or those with long hair should be cleaned more frequently, potentially weekly for the stopper mechanism.
When should I call a plumber instead of doing it myself?
Call a professional plumber when you encounter rusted or seized fittings that won't loosen with standard tools, since forcing them risks pipe damage. Leaks from shutoff valves or wall pipes, recurring problems after multiple DIY attempts, or persistent slow drainage despite cleaning all suggest blockages or damage beyond the accessible drain assembly. At 2026 rates, expect to pay $150 to $300 for a standard repair during business hours, or $300 to $800 for an after-hours emergency call, so weigh the urgency before scheduling.