What Is a Shower Cartridge and How Does It Work?
A shower cartridge is the internal valve mechanism that controls water flow, temperature mixing, and pressure in your shower. This cylindrical component sits inside the valve body behind your shower wall and contains ceramic discs, seals, and moving parts that regulate how hot and cold water combine before reaching your showerhead.
Modern cartridges use ceramic disc technology that can withstand over 500,000 cycles, making them far more durable than older compression-style valves. The cartridge works by allowing you to adjust the handle, which rotates or moves internal discs to control the ratio of hot to cold water entering the mixing chamber. Pressure-balancing cartridges maintain consistent temperatures even when water pressure fluctuates elsewhere in your home, preventing sudden scalding or cold shocks.
Most shower cartridges last 10 to 15 years under normal conditions, but hard water, mineral buildup, and frequent use can shorten their lifespan. When a cartridge fails, you'll experience issues like temperature inconsistencies, leaking, or difficulty operating the handle. Understanding how your specific cartridge functions helps you diagnose problems and decide whether you need a simple replacement or a full valve body upgrade. For a broader look at fixture longevity, our plumbing fixture lifespan guide breaks down repair vs. replace timelines for every fixture in your home.

Find Trusted & Licensed Plumbers in Ohio
Get matched with companies for your specific needs
Signs Your Shower Cartridge Needs Replacement
Recognizing the warning signs of a failing shower cartridge helps you address problems before they cause water damage or inconvenience. Most cartridge failures present clear symptoms that indicate it's time for replacement.
Temperature Control Problems
Inconsistent water temperature is the most common sign of cartridge failure. You might notice sudden shifts from hot to cold during your shower, inability to achieve your desired temperature no matter how you adjust the handle, or water that's consistently too hot or too cold. These issues occur when worn seals inside the cartridge can no longer properly mix hot and cold water.
Hard water areas experience this problem more frequently due to mineral deposits restricting internal movement. If you find yourself constantly adjusting the handle to maintain comfortable temperatures, or if low water pressure accompanies temperature fluctuations, your cartridge has likely worn out.
Leaking and Dripping
A dripping showerhead after you've turned off the water indicates seal failure inside the cartridge. While minor drips might seem insignificant, a steady drip can waste thousands of gallons annually and increase your water bill. Leaks may occur with hot water only, cold water only, or both, helping pinpoint which side of the cartridge has failed.
Check for water pooling around the shower handle or seeping through the trim plate, as these indicate more serious seal deterioration. Listen for whistling, squealing, or vibrating noises from the valve area, which can also signal damaged cartridge components or restricted internal flow. Unlike a full shower valve replacement, cartridge swaps stay behind the trim and rarely require opening the wall.
Handle Operation Issues
Difficulty turning your shower handle signals internal cartridge wear. You might experience stiffness requiring excessive force, rough or grinding sensations when adjusting temperature, or a handle that won't move smoothly through its full range. These symptoms result from worn cartridge components, corroded parts, or mineral buildup preventing proper operation.
In some cases, the handle may spin freely without controlling water flow or temperature, indicating the connection between the handle and cartridge stem has failed. If you notice any of these handle problems alongside other symptoms, cartridge replacement is necessary.
How to Identify Your Shower Cartridge Type
Identifying the correct cartridge model ensures you purchase the right replacement part. Different manufacturers use proprietary designs, so cartridges are rarely interchangeable between brands.
Brand-Specific Identification Methods
Start by checking for visible brand markings on the shower handle, trim plate, or faucet base. Common brands include Moen, Delta, Kohler, American Standard, Price Pfister, and Grohe. Once you've identified the manufacturer, you can narrow down the specific cartridge model.
Moen cartridges are identified by handle operation and physical appearance. The most common is the 1225 single-handle cartridge, which features a distinctive brass color and works with Moentrol valves. As of 2026, the Moen 1225B lists at about $44.85 with a typical web price near $30. Moen provides visual identification guides on their website showing different cartridge types based on whether your valve is single-handle, has a diverter function, or includes pressure-balancing features.
Delta cartridges primarily use the Monitor series, with the RP19804 being a long-standing standard. Many Monitor-series cartridges remain backward-compatible, simplifying upgrades. Delta offers an online cartridge identifier tool where you can input your valve model number.
Kohler cartridges vary widely depending on valve type. Look for blue components or model numbers stamped on the faucet base. Kohler specializes in thermostatic valves that maintain precise temperatures, requiring exact cartridge matches for proper function.
Measuring and Documentation
If brand markings aren't visible, remove the handle and trim plate to access the cartridge directly. Measure the cartridge diameter (commonly 25mm, 35mm, or 40mm), overall length, and note the number of splines (teeth) on the stem. Take clear photos from multiple angles.
Count any screws, check for color coding (red/blue indicators for hot/cold), and look for part numbers stamped on the cartridge body. Some manufacturers print model numbers in small text on the cartridge's brass or plastic housing.
Take note of your handle operation style. Does it rotate left/right for temperature, pull out for volume, or use a single lever for both functions? This operational method helps narrow down cartridge types when model numbers aren't available. You can also check your home's original plumbing documentation or contact the builder if your shower is relatively new.
Shower Cartridge Replacement Process
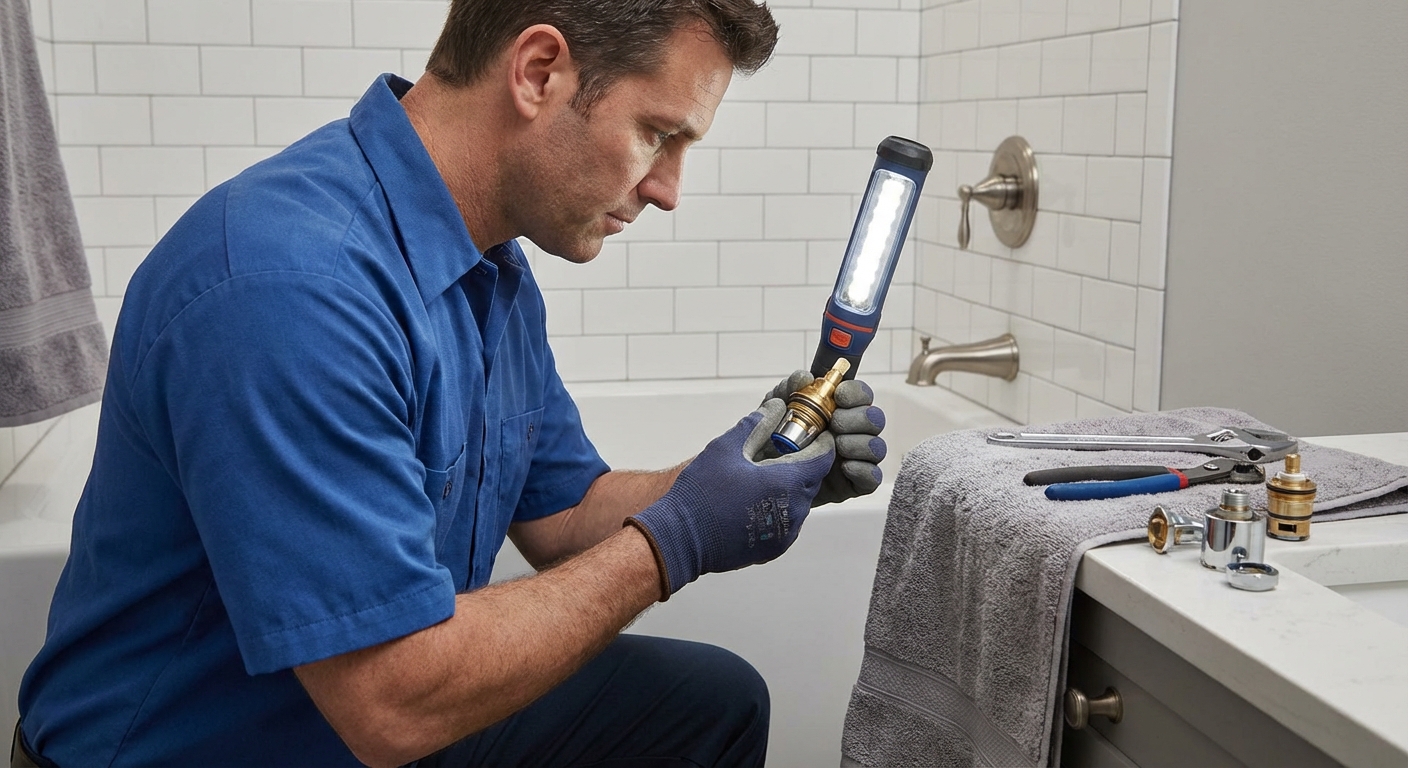
Replacing a shower cartridge is a manageable DIY project for homeowners with basic plumbing skills. The process typically takes 30 minutes to an hour once you have the correct replacement cartridge. Having the right basic plumbing tools on hand makes the job significantly easier.
Tools and Materials Needed
Gather these items before starting:
- Replacement cartridge (matched to your valve model)
- Flathead and Phillips head screwdrivers
- Allen wrenches (hex keys)
- Pliers or adjustable wrench
- Cartridge removal tool (often included with replacement)
- Silicone grease or plumber's grease
- Clean cloth or towel
- Bucket or container
- Optional: Channel locks for stubborn parts
Step-by-Step Replacement Instructions
Turn off the water supply. Locate the shower shut-off valves, typically found in an access panel behind the shower or in the basement directly below. If you can't find dedicated shower valves, shut off the main water supply to your home. Open the shower faucet to drain remaining water and relieve pressure in the lines.
Remove the handle and trim. Pry off the decorative cap or cover plate on the handle using a flathead screwdriver to expose the mounting screw. Remove the screw and pull the handle straight off the cartridge stem. Some handles use set screws accessed from underneath or the side, requiring an Allen wrench.
Unscrew the escutcheon (trim plate) by turning it counterclockwise or removing any mounting screws. This exposes the valve body and cartridge. Place a towel in the tub to catch any screws or small parts.
Extract the old cartridge. Locate the small metal retaining clip at the top of the cartridge and carefully pry it up with a flathead screwdriver or needle-nose pliers. This clip holds the cartridge in place and must be fully removed.
Insert the cartridge removal tool into the cartridge stem, ensuring it engages fully. Gently twist back and forth while pulling straight out. Stubborn cartridges may require more force, but avoid jerking motions that could damage the valve body. Some cartridges have alignment notches or specific rotation requirements for removal.
Prepare the new cartridge. Clean the valve body opening with a cloth, removing any debris or old grease. Apply silicone grease generously to all O-rings on the new cartridge. Check the manufacturer's instructions for proper orientation. Many cartridges have a "hot" side marking that must align with your hot water supply pipe (typically on the left when facing the shower).
Install the new cartridge. Align any notches or tabs on the cartridge with corresponding slots in the valve body. Push the cartridge firmly into place until fully seated. You may feel or hear a click. Ensure it's inserted straight and not tilted.
Reinstall the retaining clip by pressing it down until it snaps into the groove. The clip must be fully seated to prevent cartridge movement.
Reassemble and test. Turn the water supply back on halfway and check for leaks around the cartridge. If dry, turn on the shower to purge air from the lines. Test temperature control by adjusting from full cold to full hot, verifying smooth operation and consistent temperature.
Apply a bead of silicone caulk to the back of the trim plate if needed, then reattach it by screwing clockwise or securing mounting screws. Replace the handle and tighten the mounting screw, then snap on the decorative cap. Turn water to full pressure and run the shower for several minutes, checking for any leaks or operational issues.
Brand-Specific Replacement Considerations
Different manufacturers have unique cartridge designs requiring specific installation techniques. Understanding brand-specific requirements prevents common mistakes and ensures proper function.
Moen Shower Cartridges
Moen's 1225 cartridge is one of the most common and user-friendly designs. It features a pressure-balancing system that prevents temperature shock when toilets flush or other fixtures turn on. During installation, ensure the brass cartridge seats fully. You should feel resistance as it passes through the O-rings.
Moen cartridges have a small plastic or metal alignment tab at the base that must fit into a corresponding slot in the valve body. The "hot" side typically faces left. Moen includes detailed instructions with replacement cartridges and offers free replacement parts under their limited lifetime warranty for original purchasers.
The 1222 and 1225 models look similar but aren't interchangeable. Verify your exact model before ordering. Moen's Posi-Temp pressure-balanced cartridges typically run $60 to $80 in 2026 at major retailers, but offer improved temperature memory, maintaining your preferred setting each time you shower.
Delta Shower Cartridges
Delta's Monitor series uses cartridges like the RP19804, many of which have distinctive red and blue temperature indicator rings. The critical installation step involves correctly orienting the cartridge. A small notch marked "H" for hot must align with the hot water inlet on the left side of the valve.
The rotational limiter (temperature stop) can be adjusted on Delta cartridges to prevent water from getting too hot, an important safety feature for homes with children or elderly residents. After installation, test the full temperature range and adjust the limiter if needed by rotating the plastic stop on the cartridge stem.
Delta cartridges include a bonnet nut that must be hand-tightened clockwise until snug. Avoid using pliers, which can crack the plastic threads. If your shower has a diverter for switching between tub and shower, Delta may use a separate diverter cartridge that requires simultaneous replacement.
Kohler Shower Cartridges
Kohler manufactures diverse cartridge types depending on valve design. Their pressure-balancing valves use specific cartridges like the GP1016513, while thermostatic valves require exact model matches. Kohler thermostatic cartridges contain a wax element that expands and contracts to maintain precise temperatures, making them more sensitive to mineral buildup.
When replacing Kohler cartridges, pay close attention to the number and position of O-rings. Some models use three rings in specific locations. Apply grease only to O-rings, not ceramic disc surfaces. Kohler's installation instructions often specify a "test position" where you partially install the cartridge, test operation, then fully seat it.
Kohler valves installed before 2000 may use obsolete cartridge designs requiring valve body replacement if parts are no longer manufactured. Check Kohler's website or call their support line with your valve model number to confirm replacement availability.
Shower Cartridge Replacement Cost Breakdown
Understanding the cost components helps you budget appropriately and decide between DIY and professional installation. Pricing has shifted slightly in 2026 due to ongoing labor rate increases.
DIY Replacement Costs
If you replace the cartridge yourself, expect to spend $40 to $120 total in 2026. The cartridge itself costs $10 to $80 depending on brand and features. Basic plastic cartridges from generic manufacturers start around $10, while premium brass or ceramic cartridges from name brands cost $50 to $80. By brand, plan on roughly $25 to $75 for most Moen cartridges, $30 to $80 for Delta, and $30 to $60 for Kohler.
Additional supplies add $10 to $40: silicone grease ($5 to $8), plumber's tape ($3 to $5), replacement trim ring if needed ($15 to $30), and possibly a cartridge removal tool ($10 to $15) if not included with your new cartridge. Most homeowners already have the necessary screwdrivers and wrenches, eliminating tool costs.
DIY replacement saves you roughly $90 to $270 in labor charges. The project requires 30 minutes to 1 hour for most people, though first-timers might need up to 2 hours. For perspective on similar projects, our faucet replacement cost guide shows comparable DIY savings opportunities.
Professional Installation Costs
Hiring a plumber for cartridge replacement costs $100 to $350 on average in 2026, with a national typical price around $210. Angi's 2026 guide places the average closer to $275, with totals ranging from $100 to $400 depending on region. Labor charges typically run $90 to $270, with plumbers billing $75 to $160 per hour plus minimum service call fees of $50 to $200. Our plumbing service cost guide explains how these rates are structured nationwide.
The wide cost range depends on several factors:
- Location: Urban areas charge 20 to 40% more than rural regions. New York averages around $360, while Miami and Houston average closer to $230.
- Time of day: After-hours, weekend, or emergency service adds $50 to $150
- Accessibility: Hard-to-reach valves or those requiring wall access cost more
- Complexity: Multi-function valves or thermostatic systems take longer
- Brand: Obscure or imported cartridges may require special ordering
| Brand | Cartridge Cost (2026) | Total Professional Replacement |
|---|---|---|
| American Standard | $15-$50 | $105-$320 |
| Delta | $20-$80 | $110-$350 |
| Grohe/Hansgrohe | $25-$85 | $115-$355 |
| Kohler | $30-$60 | $120-$330 |
| Moen | $15-$80 | $105-$350 |
| Price Pfister | $20-$40 | $110-$310 |
Get quotes from at least three licensed plumbers before committing. Some companies offer flat-rate pricing for cartridge replacement, which can be more economical than hourly rates if complications arise. Read our guide on getting an accurate plumbing estimate before signing any contract.
Cost Comparison: DIY vs Professional
For a straightforward single-handle shower cartridge replacement, DIY saves $90 to $270 compared to professional service in 2026. However, several scenarios justify hiring a plumber:
- You're uncomfortable shutting off your home's main water supply
- The valve is in an awkward location requiring special tools
- You've attempted removal but the cartridge is stuck
- You're unsure of the correct cartridge model
- Building codes require licensed plumbers for valve work
- Your time is worth more than the labor savings
Consider the risk factors: improperly installed cartridges can leak inside walls, causing expensive water damage. If you're confident in your abilities and the valve is easily accessible, DIY makes financial sense. For complex installations or high-end fixtures, professional expertise provides peace of mind. If a larger repair becomes necessary, plumbing financing options can help spread the cost.
When to Replace the Entire Valve Body
Sometimes cartridge replacement isn't enough, and the entire valve body requires replacement. Recognizing when you need more extensive work prevents wasting money on temporary fixes.
Signs the Valve Body Is Failing
If problems persist after installing a new cartridge, the valve body itself has likely deteriorated. Water continues leaking despite cartridge replacement, temperature remains unstable with a new cartridge, or you notice corrosion, cracks, or damage on the visible valve body portions.
Mineral buildup inside the valve body can become so severe that new cartridges won't seal properly. Homes with hard water often experience this issue after 15 to 20 years. Pressure fluctuations affecting the entire plumbing system rather than just the shower indicate broader valve problems.
Age is a significant factor. Valves installed before 1990 often use outdated designs where replacement parts are no longer manufactured. If your shower valve is over 25 years old, full shower valve replacement makes more sense than attempting repairs with discontinued parts.
Valve Upgrade Considerations
You may choose valve body replacement as an upgrade even if your current valve still functions. Switching from a basic mixing valve to a pressure-balancing or thermostatic valve provides better temperature control and safety. Newer valves offer water-saving features that reduce consumption without compromising performance. Modern plumbing fixture upgrades can also add measurable resale value.
Bathroom remodels present ideal opportunities for valve upgrades since you're already opening walls and updating fixtures. Modern valve bodies cost $100 to $400 for the part in 2026, with professional installation adding $400 to $1,200 in labor. Total valve body replacement ranges from $500 to $1,600 depending on complexity and access.
Repair vs Replace Decision Matrix
Use these guidelines to decide between cartridge replacement and full valve replacement:
Replace only the cartridge if:
- Your valve is less than 15 years old
- Problems resolved after cartridge installation
- The valve body shows no visible corrosion
- Replacement cartridges are readily available
- You're working with a quality brand still in production
Replace the entire valve if:
- Multiple cartridge replacements haven't solved issues
- The valve is over 20 years old
- You're updating bathroom fixtures anyway
- Parts for your valve model are discontinued
- You want to upgrade to better temperature control
- Corrosion or cracks are visible on valve components
The decision also involves comparing costs. If professional valve body replacement costs $800 but you've already spent $400 on three cartridge replacement attempts, the upgrade makes financial sense. Consider the remaining lifespan of your current valve. Investing in cartridge replacement for a 20-year-old valve may only buy you 2 to 3 more years before full replacement becomes necessary.
Frequently Asked Questions About Shower Cartridge Replacement
How long does a shower cartridge typically last?
Most shower cartridges last 10 to 15 years under normal use conditions with moderate water hardness. High-quality ceramic cartridges from brands like Moen, Delta, and Kohler can function reliably for up to 20 years or more. However, hard water with high mineral content significantly shortens lifespan to 5 to 8 years due to calcium and lime buildup on internal seals and discs. Frequent use in high-traffic bathrooms or shower systems with multiple functions like body sprays may experience faster wear.
Can I replace a shower cartridge without turning off the main water supply?
While some showers have dedicated shut-off valves behind an access panel or in the basement, you must never attempt cartridge replacement without stopping water flow. If you cannot locate shower-specific shut-offs, you must turn off your home's main water supply. Attempting replacement with active water pressure will flood your bathroom and potentially cause extensive water damage. After shutting off water, always open the shower handle to release residual pressure before beginning disassembly.
Why does my shower still leak after replacing the cartridge?
If leaking persists after cartridge replacement, several issues may be responsible. The most common cause is incorrect installation, where the cartridge isn't fully seated, the retaining clip is improperly positioned, or alignment notches weren't properly matched. You may have purchased the wrong cartridge model that appears similar but doesn't seal correctly in your valve body. Less frequently, the valve body itself has deteriorated with corroded seals or damaged mounting surfaces that prevent proper cartridge seating, requiring full valve replacement.
Are generic cartridges as good as brand-name replacements?
Generic or universal cartridges cost 30 to 60% less than OEM (original equipment manufacturer) parts but vary significantly in quality. Reputable aftermarket manufacturers like Danco produce cartridges that function adequately for budget-conscious homeowners, typically lasting 5 to 8 years versus 10 to 15 years for OEM parts. However, generic cartridges may not fit as precisely, potentially causing minor leaks or temperature control issues. For high-end fixtures or homes with hard water, OEM cartridges provide better longevity and performance, making them more cost-effective long-term despite higher initial prices.
Do I need a plumber to replace a shower cartridge, or can I do it myself?
Most homeowners with basic DIY skills can successfully replace shower cartridges by following manufacturer instructions carefully. The project requires common tools, takes 30 to 60 minutes, and saves $90 to $270 in labor costs in 2026. However, hire a licensed plumber if you're uncomfortable shutting off main water supply, cannot identify the correct cartridge type, encounter a stuck cartridge that won't extract despite proper techniques, or discover leaks inside walls after replacement. Professional installation also makes sense for expensive custom fixtures where improper installation could cause damage exceeding the service call cost.