How to Identify Frozen Pipes
The first step in dealing with frozen pipes is recognizing the warning signs before the situation turns into a burst pipe emergency. The sooner you identify the problem, the better your chances of resolving it safely and affordably. The American Red Cross notes that if you turn on a faucet and only a trickle comes out, you should suspect a frozen pipe.
Common Signs Your Pipes Are Frozen
Little or no water from faucets is almost always the first red flag. If you turn on a tap and only get a trickle, or nothing at all, there's likely an ice blockage somewhere in the line. You may also notice a sudden drop in water pressure throughout your home.
Visible frost or condensation on exposed pipes is another clear indicator. Check pipes in unheated areas like basements, garages, and under-sink cabinets. Frost on the outside almost always means ice on the inside.
Strange sounds (banging, clanking, whistling, or gurgling when you turn on a faucet) indicate that unfrozen water is trying to push through an ice blockage.
Unpleasant odors from drains and faucets can signal that ice is trapping gases inside the pipe. More serious signs include visible cracks or bulges in the pipe itself, bubbling paint on walls, or water stains, all of which suggest the pipe may already be under dangerous pressure.
At What Temperature Do Pipes Freeze?
Water technically freezes at 32°F, but real-world pipe damage usually happens once outdoor temperatures fall to about 20°F or below for several hours. At 20°F, uninsulated pipes can freeze in as little as 3 hours, while insulated pipes typically take around 6 hours. At 0°F, unprotected pipes can freeze in just 2 to 3 hours. Pipes exposed to wind, drafts, or in unheated crawl spaces can freeze at even higher temperatures.
| Location | Risk Level |
|---|---|
| Exposed pipes in unheated basements | 🔴 High |
| Pipes along exterior walls | 🔴 High |
| Crawl space water lines | 🔴 High |
| Outdoor hose bibs & sprinkler lines | 🔴 High |
| Attic pipes | 🟡 Medium |
| Under-sink pipes near exterior walls | 🟡 Medium |
| Interior pipes near heat sources | 🟢 Low |

Find Trusted & Licensed Plumbers in Ohio
Get matched with companies for your specific needs
Safe Thawing Methods (Step-by-Step)
Once you've located the frozen section, follow these steps carefully. The goal is to apply slow, controlled heat, never fast or intense heat, to melt the ice without damaging the pipe or causing a burst. This is the exact approach recommended by the American Red Cross for 2026.
Before You Start
- Locate your main water shut-off and be ready to turn it off if the pipe has already cracked
- Open all faucets (both hot and cold) connected to the frozen pipe to relieve pressure and give melting water somewhere to go
- Keep faucets open throughout the entire thawing process, running water helps melt remaining ice from inside
- Start applying heat at the faucet end of the frozen section, working backward toward the coldest area
- Leave the main water supply on unless you spot a leak, since incoming pressure helps push out loosened ice
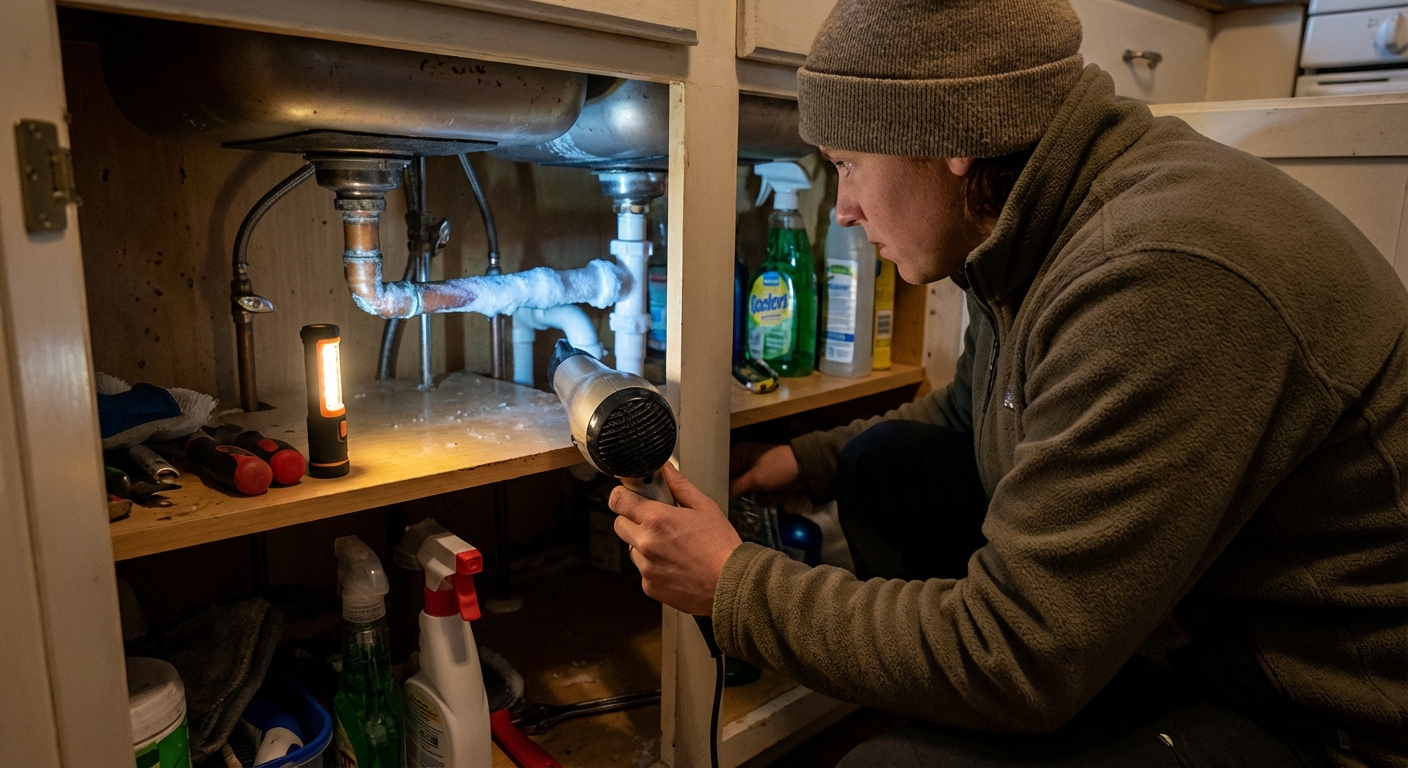
Recommended Safe Methods
Hair Dryer: Hold the dryer 3 to 4 inches from the pipe and keep it moving back and forth. This is the safest and most commonly recommended method for accessible pipes. For a standard blockage, expect to spend 30 minutes to 2 hours thawing.
Warm Towels: Soak towels in hot (not boiling) water, wring them out, and wrap tightly around the frozen section. Re-soak and reapply as they cool. This is ideal when an outlet isn't nearby.
Electric Heating Pad: Wrap around the frozen section on medium heat. Provides consistent, gentle warmth and is one of the top methods endorsed by insurance industry safety guides. Never leave it unattended.
Space Heater: Place a space heater in the room or area where the pipe is located to gradually raise the ambient temperature. Never leave it unattended, and keep it well away from flammables.
Heat Tape or Cable: UL-listed thermostatically controlled heat cable can also thaw and then prevent refreezing. Follow manufacturer instructions and never overlap the tape.
Methods You Must NEVER Use
Using the wrong heat source is one of the most dangerous mistakes homeowners make. Fire safety officials and the American Red Cross specifically warn against blowtorches, kerosene or propane heaters, charcoal stoves, and any open-flame device. High-powered heat guns are also risky because they can crack pipes and melt PVC or PEX fittings.
Fire departments report that open-flame thawing attempts are behind many home fires each winter, and blowtorches remain the single most common cause. Kerosene and propane heaters also pose a serious carbon monoxide risk in enclosed spaces. Never use them, not even briefly. Review our full plumbing mistakes guide for other DIY errors to avoid.
Thawing Pipes in Hard-to-Reach Areas
Frozen pipes don't always cooperate by being somewhere convenient. Here's how to handle the most challenging scenarios.
Pipes Behind Walls
Start with non-invasive methods first:
- Raise the thermostat to at least 70°F and open cabinet doors to circulate warm air
- Use an infrared or heat lamp aimed at the section of wall where the pipe runs, and do not leave it unattended
- Open the affected faucet to allow any thawing water to escape
If non-invasive methods fail after several hours, you may need to carefully cut a small access panel in the drywall to reach the pipe directly. A helpful tip: place a cookie sheet behind the pipe to reflect heat and protect the wall from heat damage.
For a complete seasonal plan, review our winter plumbing tips before cold weather hits next year.
Pipes Under the House (Crawl Spaces)
Crawl spaces are cold, cramped, and potentially dangerous. Before entering:
- Wear protective clothing and bring a flashlight
- Use a space heater positioned safely at the entrance to push warm air in
- Apply a hair dryer or heat lamp directly to any visible frost-covered pipes
If pipes run deep in the crawl space and aren't accessible, contact a plumber. Professionals use commercial line-thawing machines that can quickly restore water flow without excavation.
Underground/Buried Pipes
Conventional heating tools are completely ineffective for underground service lines. This situation requires a professional with a commercial line-thawing unit, a specialized device that thaws metal pipes deep underground without digging. Do not attempt to handle this yourself.
When to Call a Professional & What to Do If a Pipe Bursts
Knowing when to stop DIY efforts and call a plumber can save you thousands of dollars in water damage. According to 2026 cost data, a plumber typically charges a flat fee of about $100 (commonly $75 to $150) to thaw a frozen pipe, but if it bursts, repairs average around $500 with a range of $150 to $5,000+ depending on pipe location and access. Mainline pipe bursts average roughly $1,100 to repair, and underground work can push past $2,000.
When to Call a Professional Plumber
Call a licensed plumber immediately if:
- You cannot locate the frozen section after checking all exposed pipes
- The pipe is located behind a wall, in a ceiling, or underground
- You notice visible cracks, bulges, or active leaking anywhere in the pipe
- Your thawing attempts have not restored water flow after several hours
- You smell a burning odor from any heating device near the pipe
Professional plumbers have the right tools to thaw pipes safely and inspect the entire system for stress damage or hidden cracks. Learn more about your options in our plumbing emergency guide.
If a Pipe Bursts: Immediate Action Steps
A burst pipe can release hundreds of gallons of water within minutes. Move fast:
- Shut off the main water supply immediately, know where your shutoff valve is before winter arrives
- Turn off electricity in any affected rooms to prevent shock hazards
- Open all faucets inside and outside to drain remaining water
- Contain the water with towels, buckets, and a wet/dry vacuum, and move valuables out of the area
- Document everything with photos and video for your insurance claim
- Call a licensed plumber, do not attempt to repair a burst pipe yourself
- Contact a water damage restoration company if significant flooding has occurred to prevent mold growth
Understanding burst pipe repair costs ahead of time can help you budget and act quickly when it matters most.
Prevention Strategies for Next Winter
The best way to handle frozen pipes is to prevent them entirely. State Farm's latest data shows the top five states for frozen-pipe claim costs are Illinois, Oregon, Washington, Texas, and Tennessee, with Illinois ranking #1 nationwide, so even mild-climate homes need a plan. Here's a proven checklist to prevent frozen pipes before temperatures drop:
| Prevention Method | When to Do It | 2026 Cost |
|---|---|---|
| Insulate exposed pipes with foam sleeves | Before first freeze | $1 to $4 per section |
| Install thermostat-controlled heat tape | Fall | $20 to $100 |
| Let faucets drip during extreme cold | During cold snaps | Free |
| Keep thermostat at 55°F or higher | All winter | Minimal energy cost |
| Open under-sink cabinet doors | During cold snaps | Free |
| Disconnect and drain outdoor hoses | October to November | Free |
| Seal drafts/cracks near pipes | Fall | $20 to $80 |
| Smart leak detector / freeze sensor | Fall | $25 to $80 per sensor |
| Smart water shutoff valve | Fall | $200 to $600+ |
For seasonal or vacation properties, our plumbing winterization service guide and vacation home plumbing tips cover the extra steps needed for homes left vacant during cold months. You can also review seasonal plumbing problems and our annual plumbing maintenance checklist to stay ahead of issues year-round.
Frequently Asked Questions
How long does it take to thaw a frozen pipe with a hair dryer?
Thawing a frozen pipe with a hair dryer typically takes 30 minutes to 3 hours, depending on the pipe size, thickness of the ice blockage, and the ambient temperature in the area. Smaller exposed pipes in accessible areas tend to thaw in 30 to 60 minutes, while larger or more severely frozen sections can take considerably longer. Keep the dryer moving at all times and be patient, since rushing with higher heat can cause more damage than the freeze itself.
Can frozen pipes thaw on their own without any intervention?
Yes, frozen pipes can thaw on their own if indoor temperatures rise above freezing, and it can take up to 24 hours in mild conditions. However, waiting is risky because a pipe that remains frozen continues to build internal pressure, dramatically increasing the chance of a burst. Active thawing methods are always safer and faster, and they allow you to monitor the situation and shut off water quickly if a crack appears.
What temperature do pipes freeze at, and how fast does it happen?
Water freezes at 32°F, but most residential pipe damage begins when outdoor temperatures drop to 20°F or below for several hours. Uninsulated pipes can freeze in as little as 3 hours at 20°F, while insulated pipes typically hold out for about 6 hours. Pipes on exterior walls, in crawl spaces, or exposed to wind and drafts can freeze even faster and at higher temperatures than interior pipes near heat sources.
Is it safe to thaw pipes yourself, or should I always call a plumber?
Thawing accessible, exposed pipes with a hair dryer, heating pad, or warm towels is generally safe for most homeowners when done correctly. However, you should always call a plumber if the frozen pipe is behind a wall, underground, or in a crawl space; if you notice any cracks or leaks; or if DIY thawing hasn't worked after several hours. Professional thawing typically costs about $100 (with a range of $75 to $150), while attempting to access hidden pipes without professional tools can cause additional damage and may complicate your homeowners insurance claim.
Does homeowners insurance cover frozen pipe damage?
Most standard homeowners insurance policies do cover damage caused by a sudden and accidental pipe burst from freezing, and State Farm's 2024 through June 2025 data shows average claim payouts now exceed $30,000. However, coverage typically requires you took reasonable steps to prevent the freeze, such as maintaining heat at 55°F or higher and shutting off the water in vacant homes. Gradual leaks, wear and tear, or negligence (like leaving the heat off during a known cold snap) are usually not covered, and the policy generally pays for water damage but not the pipe replacement itself. Learn more about burst pipe repair costs and insurance to understand what you may owe out of pocket.